traP Advent Calendar 2016 の12/18担当のOsa_Pyonです。
この記事ではUNITYの公式チュートリアルを参考にしてすごく簡単なローグライクゲーム(不思議のダンジョン)のようなものを作りながらゲームエンジンのUnityに触れていきます。
プレファブの作成
いきなり知らない用語が出てきましたがプレファブとは簡単に言うとゲーム中で使われるモノ(ゲームオブジェクト)をあらかじめ作っておく機能です。ではプレファブを作ってみましょう。
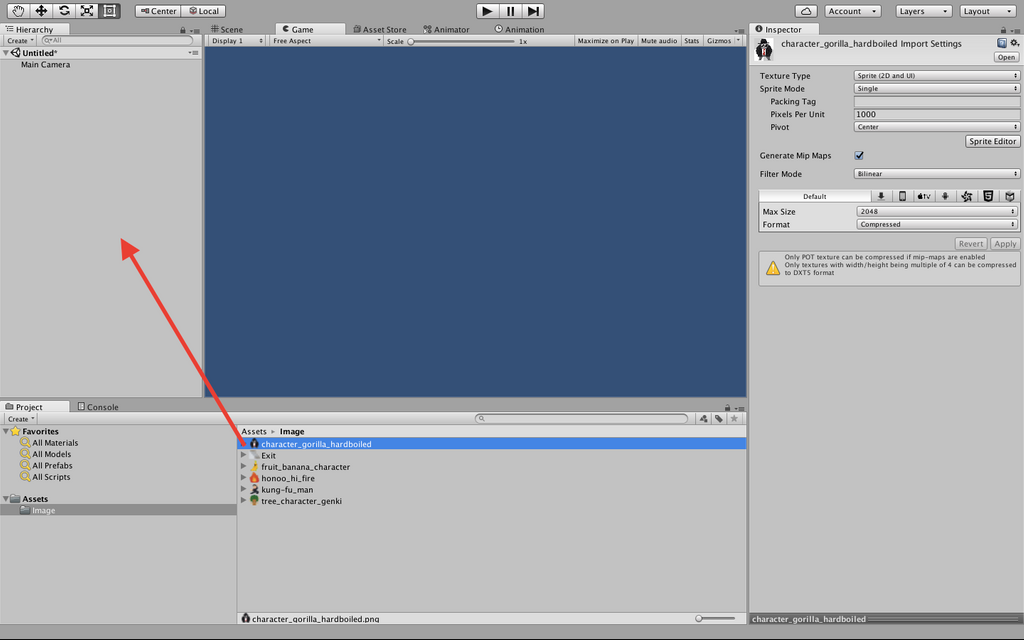
今回作成するものは2Dゲームなので2D設定でプロジェクトを作成します。そしてImageフォルダを作成しそこに素材となる画像ファイルをファイルをインポートしましょう。今回必要な素材は敵、階段、壁、プレイヤー、回復アイテムです。インポートした画像を選択し右側のinspectorビューからpixel per unitの値を画像の高さ(幅)より少し大きな値に設定しApplyボタンをクリックしてください。今回は全てpixel per unit=1000とします。
![]()
画像ファイルを左側のhierarchyビューにドラッグ&ドロップするとゲームオブジェクトが生成されます。
ですがこのゲームオブジェクトは座標と画像表示の機能しか持っていません。なのでinspectorビューのAdd ComponentからRigidbody2DとBocCollider2Dを追加します。
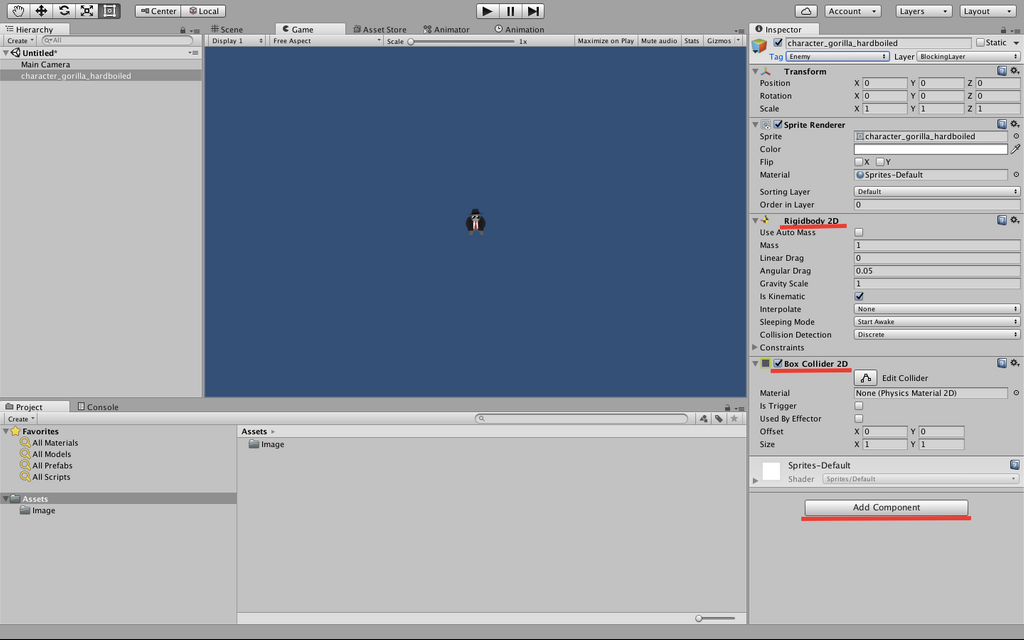
Rigidbody2Dは物理演算の機能を持ち、BoxCollider2Dは当たり判定の機能を持ちます。ゲームオブジェクトそれぞれに対し画像のようにコンポーネントのパラメータを設定します(アイテムと階段にRigidBodyは不要)。

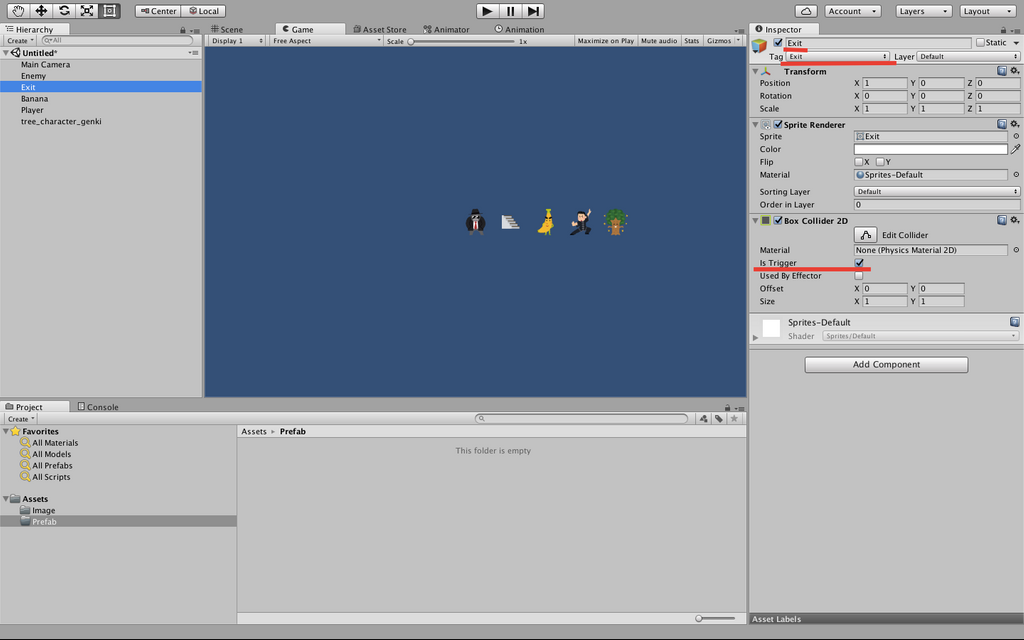

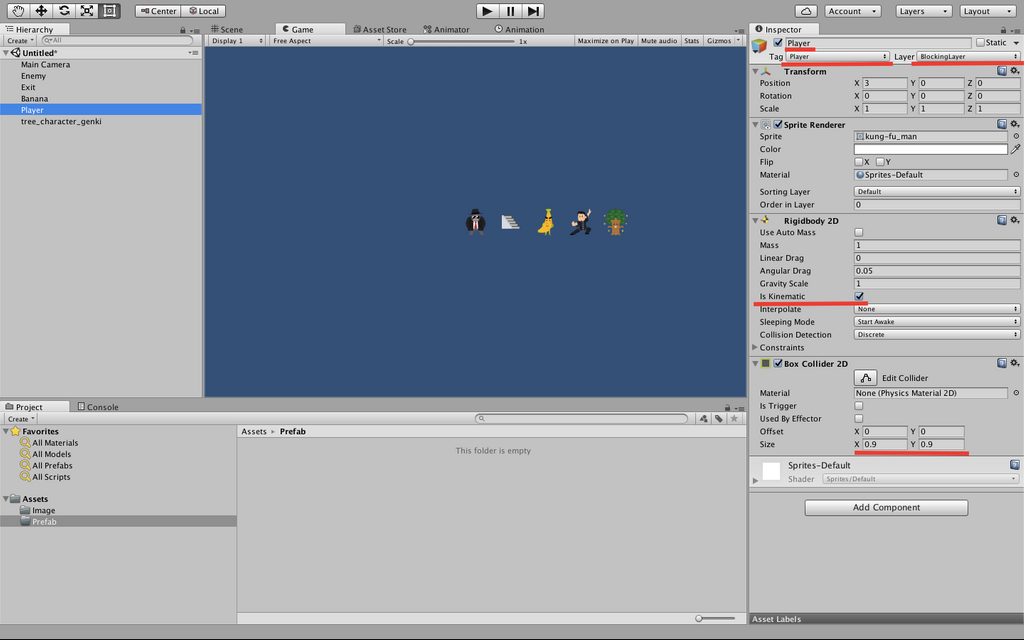
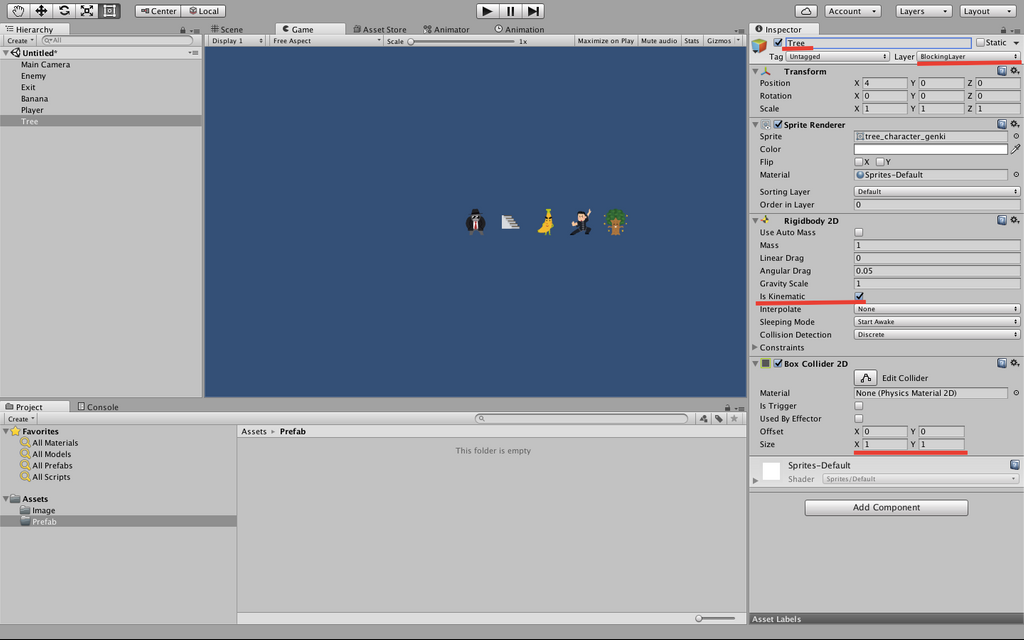
Prefabフォルダを作成しそこにゲームオブジェクトをドラッグ&ドロップするとプレファブが生成されます。プレファブが出来たらinspectorビューのゲームオブジェクトは削除しちゃいましょう。
シーンの作成
下のprojectビューにSceneフォルダを作成しその中で右クリックをしてMainシーンとClearシーンを作成しましょう。シーンを作成したらMainシーンへ移動しましょう。
マップ、ゲームマネージャーの作成
一般にローグライクと言うと"ランダムマップに挑戦"ですが今回はマップをあらかじめ用意しておき、階層も1フロアのみです。それはローグライクなのか?以下がスクリプトになります。
BoardManager.cs
using UnityEngine;
using System.Collections;

public class BoardManager:MonoBehaviour
{
public GameObject[] map_chip;

//0;無 1;壁 2;敵 3;アイテム 4;階段
int[,] map=new int[,]
{
{1,1,1,1,1,1,1,1,1,1},
{1,0,0,3,0,0,0,0,0,1},
{1,0,0,0,0,1,0,0,0,1},
{1,0,0,0,0,2,0,0,0,1},
{1,0,3,0,0,0,0,0,0,1},
{1,0,0,0,0,0,0,0,0,1},
{1,0,0,1,0,0,1,0,0,1},
{1,0,0,0,0,0,3,0,2,1},
{1,0,0,0,0,0,0,0,4,1},
{1,1,1,1,1,1,1,1,1,1}
};
//マップを作成するメソッド
public void BoardSetUp()
{
for(int x=0;x<10;x++)
{
//本来は0を床に対応させるが今回は素材が無いのでなにも対応させない
for(int y=0;y<10;y++)
{
if(map[x,y]!=0)
{
Instantiate(map_chip[map[x,y]],new Vector3(x-1,y-1),Quaternion.identity);
}
}
}
}
}
GameManager.cs
using UnityEngine;
using System.Collections;
using System.Collections.Generic;

public class GameManager:MonoBehaviour
{
public float turnDelay=.1f;

public BoardManager boardScript;

//public static で宣言すると他のシーンやスクリプトから読み書きできるようになる
public static GameManager instance=null;

public int playerHP=100;

[HideInInspector] public bool playerTurn=true;

public List<Enemy> enemy;
private bool enemyMoving;

void Awake()
{
//GameManagerがシーン内に複数存在しないようにする
if(instance==null)
{
instance=this;
}
else if(instance!=this)
{
Destroy(gameObject);
}

//シーンが変更されてもオブジェクトが破棄されないようにする
DontDestroyOnLoad(gameObject);

enemy=new List<Enemy>();

boardScript=GetComponent<BoardManager>();
InitGame();
}

void InitGame()
{
enemy.Clear();

boardScript.BoardSetUp();
}

public void GameOver()
{
enabled=false;
}

void Update()
{
if(playerTurn||enemyMoving)
{
return;
}

StartCoroutine(MoveEnemy());
}

public void AddEnemyToList(Enemy script)
{
enemy.Add(script);
}

IEnumerator MoveEnemy()
{
enemyMoving=true;
yield return new WaitForSeconds(turnDelay);
if(enemy.Count==0)
{
yield return new WaitForSeconds(turnDelay);
}

for(int i=0;i<enemy.Count;i++)
{
enemy[i].MoveEnemy();
yield return new WaitForSeconds(enemy[i].moveTime);
}

playerTurn=true;
enemyMoving=false;
}
}
Loader.cs
using UnityEngine;
using System.Collections;

public class Loader:MonoBehaviour
{
public GameObject gameManager;

//このゲームオブジクトが生成された時GameManagerを生成する
void Awake()
{
if(GameManager.instance==null)
{
Instantiate(gameManager);
}
}
}
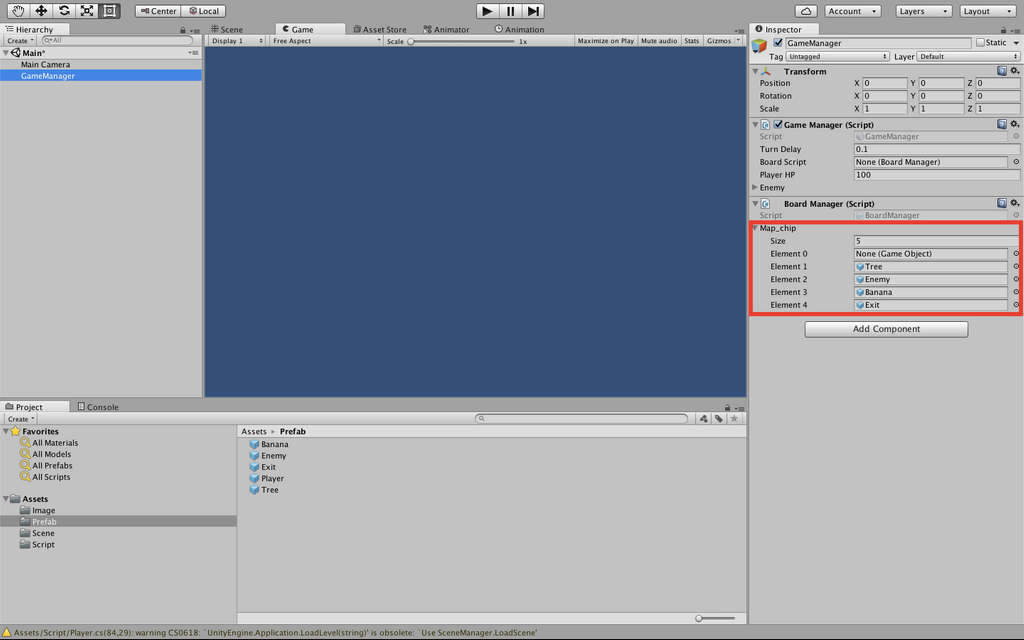
まずゲームマネージャーのプレファブを作成します。hierarchyビューでCreateEmptyを行い座標情報のみを持つゲームオブジェクトを作成し名前をGameManagerに変更し、スクリプトGameManagerとBoardManagerをAdd Componentします。BoardManager.csはマップチップの情報を持っていないように見えますが大丈夫です。UNITYではpublic変数はスクリプト外のinspectorビューから変更を加えることができます。"GameManagerオブジェクトのinspectorビューのBoardManagerコンポーネントのmap_chipのサイズを5にして、プレファブの作成"で作成したprefabを順番に気をつけてドラッグ&ドロップします。
後はこれをプレファブ化します。あとはMainCameraにLoaderスクリプトをアタッチしMainCameraのhierarchyビューのGameManagerにプレファブGameManagerをアタッチすれば大丈夫です。最後にMainCameraの座標を(3.5,3.5,-10)にして(0,0,0)にPlayerオブジェクトを設置すればマップ生成は終了です。
キャラクターの移動
キャラクターの移動に関してですがこれは解説しようとするとUNITYの話というよりもプログラミングの話となってしまうので解説はかなり省きます。
MovingObject.cs
using UnityEngine;
using System.Collections;

public abstract class MovingObject:MonoBehaviour
{
public float moveTime=0.1f;
public LayerMask blockingLayer;

private BoxCollider2D boxCollider;
private Rigidbody2D rb2D;

//計算を簡単にするための値
private float inverseMoveTime;

protected virtual void Start()
{
//何度もGetConponentを使うことを避ける
boxCollider=GetComponent();
rb2D=GetComponent();
inverseMoveTime=1f/moveTime;
}

//現在地から目的地まで移動可能かどうかを判定する
protected bool Move(int xDir,int yDir,out RaycastHit2D hit)
{
//現在地と目的地を取得
Vector3 start=transform.position;
Vector3 end=start+new Vector3(xDir,yDir);

//自身の当たり判定を無効化する
boxCollider.enabled=false;

//現在地から目的地の間にblockingLayerのついたGameObjectがないか判定
//自身の当たり判定を無効化していないと自身を障害物と認識してしまう
hit=Physics2D.Linecast(start,end,blockingLayer);

//自身の当たり判定を有効化する
boxCollider.enabled=true;

if(hit.transform==null)
{
StartCoroutine(SmoothMovement(end));
return true;
}
return false;
}

//現在地から目的地へ移動する
protected IEnumerator SmoothMovement(Vector3 end)
{
//ベクトルを2乗する
//平方根の計算は時間がかかるため距離の2乗を用いて計算する
float sqrRemainingDistance=(transform.position-end).sqrMagnitude;

//Epsilonは極めて微小な値
while(float.Epsilon
Player.cs
using UnityEngine;
using System.Collections;
public class Player:MovingObject
{
public int pointsPerFood=20;
public int atk=1;
private int HP;
protected override void Start()
{
HP=GameManager.instance.playerHP;
base.Start();
}
private void OnDisable()
{
GameManager.instance.playerHP=HP;
}
void Update()
{
if(!GameManager.instance.playerTurn)
{
return;
}
int horizontal=0;
int vertical=0;
horizontal=(int)Input.GetAxisRaw("Horizontal");
vertical=(int)Input.GetAxisRaw("Vertical");
//上下キーと左右キーを同時に押した時左右を優先する
if(horizontal!=0)
{
vertical=0;
}
if(horizontal!=0||vertical!=0)
{
AttemptMove(horizontal,vertical);
}
}
protected override void AttemptMove(int xDir,int yDir)
{
HP--;
base.AttemptMove(xDir,yDir);
RaycastHit2D hit;
CheckIfGameOver();
GameManager.instance.playerTurn=false;
}
protected override void OnCantMove(T component)
{
Enemy hitEnemy=component as Enemy;
hitEnemy.LoseHP(atk);
}
private void OnTriggerEnter2D(Collider2D other)
{
if(other.tag=="Exit")
{
Invoke("Restart",1f);
enabled=false;
}
else if(other.tag=="Food")
{
HP+=pointsPerFood;
other.gameObject.SetActive(false);
}
}
private void Restart()
{
Application.LoadLevel("Clear");
}
public void LoseHP(int loss)
{
HP-=loss;
CheckIfGameOver();
}
private void CheckIfGameOver()
{
if(HP<=0)
{
GameManager.instance.GameOver();
this.gameObject.SetActive(false);
}
}
}
Enemy.cs
using UnityEngine;
using System.Collections;
public class Enemy:MovingObject
{
public int atk=10;
public int HP=3;
private Transform target;
private bool skipMove;
protected override void Start()
{
GameManager.instance.AddEnemyToList(this);
target=GameObject.FindGameObjectWithTag("Player").transform;
base.Start();
}
protected override void AttemptMove(int xDir,int yDir)
{
if(skipMove)
{
skipMove=false;
}
base.AttemptMove(xDir,yDir);
skipMove=true;
}
public void MoveEnemy()
{
int xDir=0;
int yDir=0;
//HPが0になると動けなくなる
if(HP>0)
{
//x座標が同じのときプレイヤーのy座標に向かう
if(Mathf.Abs(target.position.x-transform.position.x)<float.epsilon) {="" ydir="target.position.y">transform.position.y ? 1:-1;
}
//y座標が同じのときプレイヤーのx座標に向かう
else
{
xDir=target.position.x>transform.position.x ? 1:-1;
}
}
AttemptMove(xDir,yDir);
}
protected override void OnCantMove(T conponent)
{
Player hitPlayer=conponent as Player;
hitPlayer.LoseHP(atk);
}
public void LoseHP(int loss)
{
HP-=loss;
}
}
</float.epsilon)>
上のPlayerスクリプトをPlayerプレファブに、EnemyスクリプトをEnemyプレファブにアタッチして、inspectorビューのPlayer(Enemy)コンポーネントのBlockingLayerをBlockingLayerにします。これにてMainシーンですべきことは全て完了しました。
# ゲームクリア画面
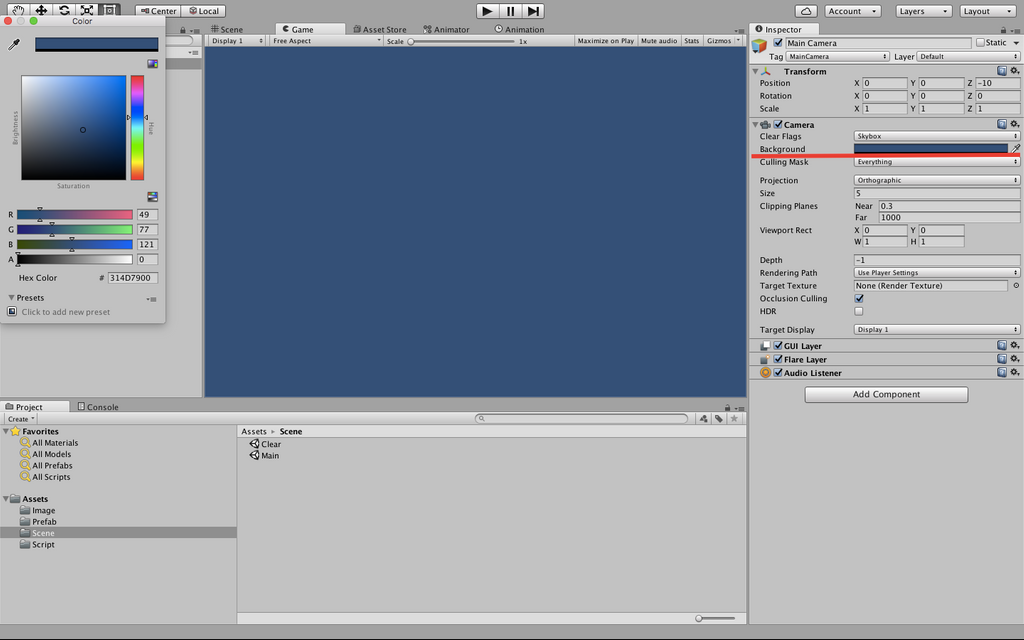
Clearシーンに移動してクリア画面を作成します。MainCameraを選択した状態でinspectorビューのbackgroundをクリックし背景を白(お好みで構いません)にします。
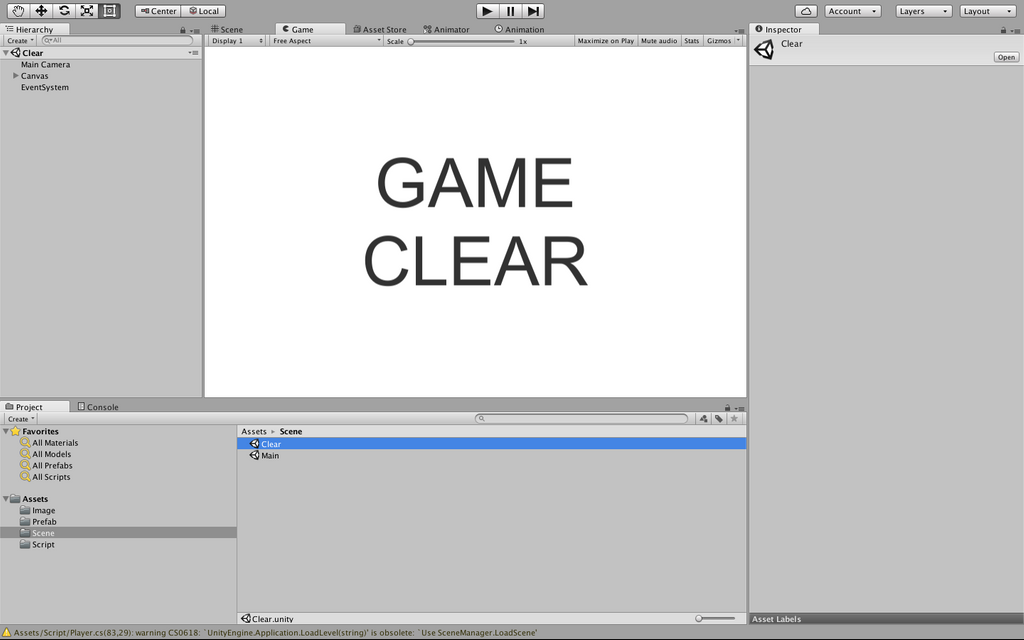
hierarchyビューでUIのTextを作成します。するとCanvasという選択した覚えのないゲームオブジェクトも一緒に生成されますがこれはUIを画面に表示するために必要なモノなので間違って削除しないようにしてください。inspectorビューからTextのWidth、Height、Font、Font Sizeを好みのサイズにしText内容をGame ClearにすればClearシーンは完成です。
# ビルド
最後にゲームをビルドしましょう。上部のfileからBuild Settingを開きMainシーン、Clearシーンの順にシーンをドラッグ&ドロップします。そして対象となるプラットフォームを選択しBuildをクリックすればゲームの完成です(やったね)。
[Mac版](/content/images/2016/12/AdventCalendar.app_.zip)
[Win版](/content/images/2016/12/AdventCalendar.exe_.zip)
[Linux版](/content/images/2016/12/AdventCalendar.x86.zip)
#
# 素材利用、参考にしたサイト
[http://www.irasutoya.com](http://www.irasutoya.com)
[https://docs.unity3d.com/ja/current/Manual/](https://docs.unity3d.com/ja/current/Manual/)
[http://hiyotama.hatenablog.com/entry/2015/05/25/090000](http://hiyotama.hatenablog.com/entry/2015/05/25/090000)